


Sea is vast. Ships are small. You can not expect to hit a ship by simply throwing your weapons in the general direction of the enemy. Anything but about one vector will give you a miss. Below is advice on finding that vector.
*Please note while this info is old (many graphic updates have been added over the years) and some of the options like using your cursor in aiming (cursor disappears after a short time of inactivity today) no longer work but the information is sound.
Aiming
PT's torpedoes:
The method of "constant bearing":
Make your PT's speed equal to that of a torpedo (39 mph; engine
RPM = 23.5 unless there is wind; usually the wind is disabled in
the online arena, but check if it is, because the boat will float
with the wind like a balloon would). Allow a few seconds for your
speed to stabilise; every maneuver, however slight, drains
some speed too, and the boat will rock side to side for a few
seconds after the turn, so you will have to wait for some short
time after every maneuver before you continue aiming; further on,
if there is wind, you have to adjust the RPM after any and every
course adjustment.
Find the approach course with which the bearing to your selected
target is not changing, that is, find the collision course
for the torpedo. Launch your torpedoes when within range (see
advice on range finding). That's it, basically.
Details (PT's only):
With long distance aiming, put your mouse cursor or aim your guns
at the target and check if it drifts across the screen in any
direction. Turn into the direction of drift. Allow 5 seconds for
your boat to stabilise. Check again. Continue until the drifting
stops. With practice, you can find the right course in about 5
such turns or less. At the medium range, as the distance is
closing, you can watch the target grow at both ends, pixel by
pixel, in the opposite directions, meaning your boat (or your
torpedo) is going to collide with it; drop your torpedo, and it
will.
The mouse cursor is a good aiming device but you may want to aim
from the gunner position to be able to look around sometimes
without losing your aim.
Aiming PT torpedoes at particular types of ships:
CV:
It is a big target so you can get a good torpedo solution from far
away. It is so huge you can even aim a particular point of its
hull (or aim its superstructure) from 5000 yards away, or get a
torpedo solution very quickly when the range is short.
CA:
It is a bit harder to hit, yet its distinctive funnels become
visible from far away. The funnels are sloping backwards so you
can always tell if the target is drifting by watching the pixels
at the funnels' edges.
DD:
It is, obviously, the most difficult target to hit, so you may
have to come within 3000 yards, when its sloping mast becomes
visible with the maximum zoom-in. Watch the pixels run up or down
the mast to find out if it is drifting to the bow or to the stern,
respectively.
Turn into the direction of drift until the target is stable
enough.
Be careful not to come within about 1600 yards of your target, or
some other ship in the fleet, as you will be shot at. After the
DD's mast has become visible (3000 yards), you have no more than 1
minute left to aim, launch your torpedoes and turn away, or even
less than 1 minute (sometimes considerably), depending on the
approach course.
In some terrains, DD is the fleet's main ship, so you absolutely
have to be able to hit it for sure. Once you have acquired that
skill, however, hitting a CV or a cruiser is a piece of cake.
Air attacks:
Below is a detailed description of some calculation-based techniques that can help you bring your bomber/formation to the desired drop point during the attack (you have to be at both the right course/speed/altitude and the right distance from your target when you come there; it may often be not easy, especially if you are flying a formation).
A much easier way is attacking by visual reference (see Small CV 36 degrees view and Small CV 36 degrees chart as an example), but you have to prepare that reference first by making those calculation-based practice attacks offline utilising the (rather complicated) techniques described below; you take snapshots during those attacks and inspect them closely. This preparation is more than worth the effort, though: it makes your attacks a lot easier, as you do not need to calculate the target's heading once you have visual reference. You do not need to look at the compass at all any more. But first, you'd better learn to do it "the hard way" to be able to attack the target you have never seen before.

First of all, you have to determine the target's course with as good an accuracy as the AH round compass permits (do not use the flat repeater compass as it is misleading).
Come within the visibility range of the target and find out its exact course in either of the following two ways:
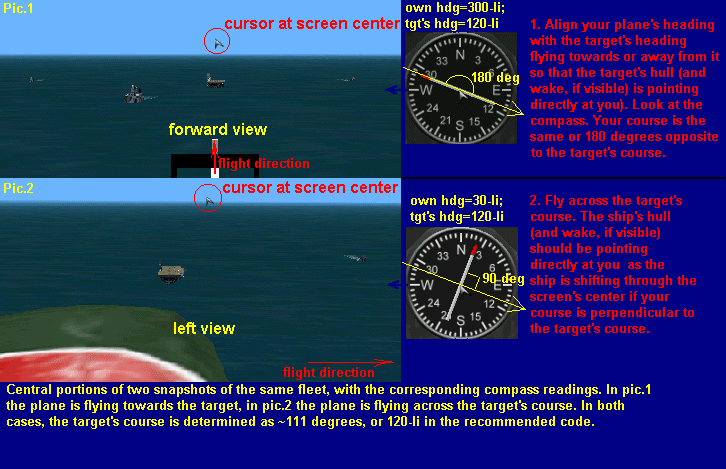
1.
Align your plane's heading with the target's heading flying
towards or away from it (view the ship's wakes if you are within
8000 yards from them: they should be pointing directly at you).
Switch the autopilot-level on. Look at the compass. Your heading
is the same or 180 degrees opposite of the target's heading.
2. Fly across the target's course. The ship's hull (or wake)
should be pointed directly at you while the ship is shifting
through the screen's center if you manage to bring your course to
90 degrees angle-on-bow of the target's course (also, you can put
the mouse cursor at the screen's center for additional reference
and use the zoom-in for increased visibility and accuracy). Switch
the autopilot-level on. Look at the compass. You are on the attack
course. To get the target's course, add (or subtract) 90 degrees
to (or from) your heading.
^^^^^^^^^
note#1: If you are quite familiar with the particular fleet's
formation (through offline preparation), you can sometimes
determine its course with sufficient accuracy (for immediate
attack) by observing it from the beam, i.e. from 90 degrees off
its starboard or portside.
It is even possible sometimes to predict which course it is
turning into by watching the periferal ships' evolutions.
note#2: Determining the target's course is easier, in fact, if you
are low. Besides, flying "below the radar" reduces the chance of
alerting your enemy.
note#3: You do not need to take those direction figures (like "90
degrees"), literally: you could be better off when thinking of
directions in terms of the "recommended code" (see picture below)
because that is how the directions are represented in the round
compass (e.g. 90 degrees = 3 numbered sectors of the round compass
>> 1 numbered sector of the round compass = 30 degrees = 5
round compass marks >> 1 round compass mark = 6 degrees).
Furthermore, if you choose to advise you squadmates on the
target's heading, using the recommended code can spare you the
necessity of calculating the true azimuth in digits with your
mates converting them back into the round compass representation.
Less figures - less errors.

I
suggest everybody only uses the round compass (the one with the
red-pointed arrow) to avoid confusion as the "tape" flat compass
repeater has a different grading (a mark is worth 5.5 degrees vs.
6 degrees in the round compass) and is often altogether illegible.
Be wary, however, that the round compass is not perfect either, as
the actual axis of the compass arrow is offset from the center of
the dial in some planes (not all), thus producing an error of as
much as about 3 degrees when your heading is N-W or S-E; it does
not matter much if you are attacking a CV, but it may be enough to
give you a miss by half a hull's length when attacking a destroyer
in a TBM from the long range. In such cases, the flat repeater
compass can be handy to make up for the error, as it does have
clearly visible marks for cardinal directions.
^^^^^^^^^
When the target's course and your relative position to it are
known, decide upon which board of the target you are going to
attack, and put the mouse cursor at the respective spot (using the
picture below or cockpit art: see "some tricks" below).

Now
you are (almost) ready to start your attack run in one of the ways
described below.
Why "almost"?
Well, there still is one issue you must not fail to consider
whichever way of attack you choose: it is the altitude of drop.
It takes a torpedo some time to reach water after you drop it. In
the meantime, it travels at your plane's speed, not at its own
speed (39 or 47 mph). Torpedo reaches water almost immediately
(1.5 seconds) after drop when your altitude is very low (50 feet),
whereas this span is about 3 seconds when dropping from the
altitude of 200 feet (minimum alt for wingies in a formation).
Further on, it is 4 seconds @300feet, 5 seconds @400feet and as
long as 7.5 seconds @900feet (TBM torpedoes' max practical safe
drop).
Why is it important? Because the CV's arc length is about 6
degrees from ~2000 yards away (minimum safe drop distance), with
that number for the destroyer being twice as small, and the
bearing to the target is changing as fast as 1 degree/second.
So, if you are too high or late on the trigger, or do not
compensate for that time span by dropping before the desired
bearing is achieved, your torpedo may pass before the target's
bow, especially if your target is a destroyer.
Take that into consideration while aiming.
Now start making your approach.
Here are four methods of doing it:
1. "Aim in advance":
This method can be used with any type of torpedo bomber/torpedo.
This method can be used when you know the target's course in
advance.
If you can get ahead of the target off its side, do so, then go at
the attack course towards your target while still far away from
it(attack course=target's course + or - 90 degrees). Wait till the
cursor aligns with the target: you have now found the correct
angle of attack (36 or 41 degrees, depending on your
plane>>type of your torpedoes), but the range is still too
far. Now turn into the target and steer towards a point about 5 or
10 degrees of arc off its bow; in other words, head almost
directly at the target but for 5 or 10 degrees towards the
direction it is going (this way, the cursor is somewhere near the
target's tail when in the maximum pilot's zoom-in). With your
speed around 200 mph, you will notice the bearing to your target
stays the same: in a way, it is a "collision course"; this way,
you are closing the range to the target while retaining the angle
of attack (36 or 41 degrees). As you are approaching the target,
bring your flight parameters within the drop limits: speed
(TAS)<~190mph, preferably<180mph; alt<~400ft,
recommended=200ft or 130 ft, when in a formation, or ~50 ft when
in a single bomber, and check what your wingies are doing. Look
around for enemy's fighters near you or PT's in your flight path,
just in case. Prepare to drop.
When in a Ju-88/Ki-67/B5N (fast/short range torpedoes), you are
within the torpedo range as soon as you see the first tracers from
the nearest destroyer (firing at you). When in a TBM (slow/long
range torpedo), you acquire the range a lot earlier (see "Range
finding" and "some figures" parts below). When within range, turn
towards the target's bow (firmly but smoothly, when in a
formation) until the cursor aligns with the tail part of the
target's hull or just behind the superstructure (no zoom view).
After the drop, turn away as tightly as you can (the shortest way
out of acks is towards the target's bow). You can not keep your
sluggish wingies from flying quite close to the escorts, but
changing your altitude a bit above and below 200 feet will make
them change their altitude as well while staying fast. With luck,
they can escape with little or no damage. Make sure you do not
lose them altogether in the egress, though.
As soon as the immediate danger from automatic acks is over, and
if situation permits, you can go to a gunner's position or outside
view to watch your fish go.
"Aim in advance" is my preferred choice when attacking by visual
reference, too, if I have done the offline preparation for
attacking the particular type of fleet.
E.g., if I am flying a Ju-88, Ki-67 or B5N, and my target is the
small CV fleet (the most common in AH: 1 CV, 1 CA, 4 DD's), I
maneuver quite far from the target until I reach the relative
position when the fleet looks as in leftmost picture below or
middle picture below (the closest forward destroyer aligns in view
with the furthest rear one), then turn into the target fleet
etc.etc., as described above. When in a TBM, the fleet should look
as in rightmost picture below at the desired angle.
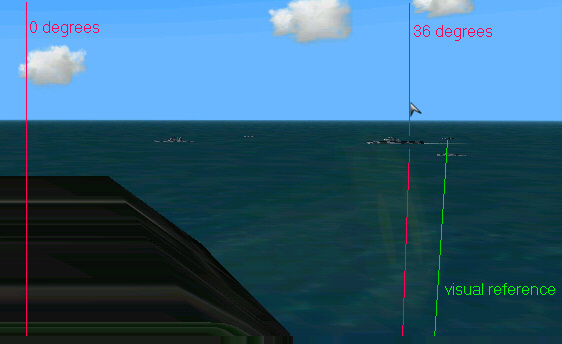


There
is a big advantage in this method as you approach your target
along the shortest route possible, and attack immediately, leaving
your enemy very little time to react. 15 seconds after those in
the ships see your icon (3.6 Kyards away) your torpedoes are in
the water. Unless your enemy knows enough to make a hasty use of
that ships control panel to turn the fleet, count till 100, and
its all over.
2. "Right angles approach" for fast/short-range torpedoes:
This method was primarily designed for practice (and preparation)
attacks with torpedo bombers carrying fast/short-range torpedoes
(Ju-88; Ki-67; B5N), especially for those 2 types that fly in
formations.
This method can be used when you are not attacking by visual
reference, and do not know the target's course beforehand. That
is, you use it when you can not "aim in advance" or "aim by visual
reference" for some reason, like when you have to approach your
target from the stern and attack it ASAP, or when you have to
attack an unfamiliar or decimated fleet or a single ship (that can
not be "visually referenced").
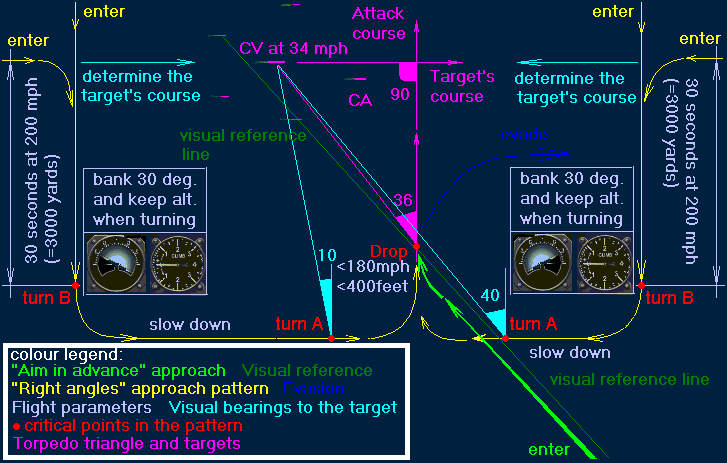 >
>See
picture above for variants of approach. All of them are especially
intended for use with formations of bombers, when you can not turn
tightly. As you may notice, those patterns have something in
common with the landing pattern of an airport. Pay attention to
the 30-seconds "crosswind" section: you cross the target's course
behind its stern or well ahead of its bow (you can determine your
target's course and your attack course that way). After you have
crossed the target's course line, keep moving on for 30 seconds at
~200mph (you will cover about 3000 yards) then turn along the
target's course, keeping your wingies with you as you turn. This
will give you sufficient space to turn the whole formation into
the attack course, later on, without getting too close to the
target's acks. Inspect the screenshots of the artificial horizon
and VSI in Approach patterns picture above. If you follow the
pattern "by the book" (turn as indicated, and at the correct
spots, as well as keep the recommended speed), it will bring you
into the attack course after the last turn, with a few seconds to
make the last hdg/alt/speed/aiming check before you drop.
The "Right angles" pattern was designed for turning at the
30-degree bank without using the rudder for the following reasons:
firstly, you can be sure your wingies stay with you if you turn
that way; secondly, you have some edge to press your turn a bit
tighter with your wingies still staying with you, to correct for
some minor mistakes in your dead-reckoning; lastly, such turn is
easy to perform with only slight control inputs (some practice is
recommended, though, so that you can do it automatically without
looking at the gauges). Furthermore, if the co-ordinated attack
tactics is to be developed (some day, sooner or later), the
participants can advise each other on their positions relative to
the target using the exact and clear pattern terms (just like the
airport controller does when managing the air traffic). So, rather
than describing his current position and probably confusing his
team-mates, a player can use some clear definitions like "I'm
(in)..." + "...forward/rear crosswind to port/starboard",
"...port/starboard/center upwind/downwind", "...port/starboard
base", "...direct approach into port/starboard", "...attack run",
"evading", "going around" etc. See picture below. I see it (or
some similar code) as absolutely essential to achieve the perfect
timing of a co-ordinated attack.

Finding
the correct spot to start turning into the attack course (turn A
as in Approach patterns picture is the most important issue during
your approach. You find that spot by observing the relative
bearing to your selected target (A relative bearing to the target
is the angle between your own course and the visual bearing to the
target).
If the "30-seconds" "crosswind" section of the pattern has been
done properly, I use the following "rule of the thumb" (see
belowfor illustration):
When
coming to the target from the stern (turn A from upwind: see
above), start a smooth turn into the attack course (towards the
target) as soon as you see the target at the relative bearing of
90+10=100 degrees; in other words, you look at the target using
the right or left view, respectively, and you start the turn A
shortly after you have ovetaken the target, i.e. shortly after the
target has passed through the screen center.
When coming to the target from the bow (turn A from downwind:
start a smooth turn into the attack course (towards the target) as
soon as you see the target at the relative bearing of 90-40=50
degrees; in other words, you look at the target using the right or
left view, respectively, and you start the turn A as soon as the
target is between the 36 degrees mark for the respective board
(where you have put the cursor prior to attack) and the edge of
the screen.
Be advised that the screen covers an arc of 90 degrees (45 from
the center to either side) without zoom, and 30 degrees (15 from
the center to either side) in the maximum pilot's zoom-in view
(make yourself familiar with the bearings scale in below to get
the "feel" of how wide your field of view is at various zoom
levels); so, 10 degrees off-center will be about 2/3 of the screen
in the maximum pilot's zoom-in.
The
method #2 has a big downside to it, and that is tactical: you have
to spend quite a lot of time near your target (up to 3 or 4
minutes) within a relatively close range to it (~4000 yards or
so). That is why I recommend you use it primarily for practice
attacks offline (to practice flying a formation of bombers at
tree-top level and getting visual ranges to the target, as well as
to prepare those "visual reference" attacks). Online, it is only
good for attacking destroyers/cruisers fleets or single ships in
unfamiliar terrains.
If the CV is present, you are very likely to stir a wasps' nest,
if you haven't already; besides, you allow the enemy enough time
to comprehend the danger and prepare to turn the fleet. Further
on, if the enemy fleet has started making some sharp evasive
turns, its speed increases (up to a maximum of 41 mph immediately
after a 180-degree turn, then gradually decreasing back to its
normal 34 mph during some 5-7 minutes); the attacker will have to
bring respective adjustments into his aiming. Then, the range of
4000 yards (or even 6000 yards, for that matter) is not safe if
the fleet has a decent shooter at the controls of that
automatic-proximity fuse 5 inch machine-gun; the presence of
enemy's fighters and lack of escort can make this method
altogether impossible.
Generally, a well-defended alerted CV fleet makes quite a
difficult target for a single bomber, or, for that matter, for a
number of uncoordinated single bombers. What makes it even more
difficult is the fact that, with the current pretty short target
recovery time, you have to deliver 3 torpedo hits on the fleet's
main ship within 15 minutes or so, in order to kill it.
Tactics of a co-ordinated covered torpedo attack to overcome even
the strongest defence still has to be developed for AH use. For
now, most you normally achieve is disrupt the enemy's attack and
frighten the CV away from your own airfield, or make it turn in
place.
Fortunately, the tactics of a stealth attack and delivering a
decisive 3-torpedo blow to a "visually referenced" target before
you alert your enemy, combined with the "aim in advance" tactics,
brings much better result, if you can find that fleet early
enough.
3. "Right angles" approach for long range torpedoes:
This method was designed for use with torpedo bombers carrying
slow/long range torpedoes (AH currently has only one, namely,
TBM).
It is a more "liberal" variation of the "Right angles" approach
described in item 2 above. It is "more liberal" in the sense that
a) the TBM is not a "formation" bomber (currently), so you can
turn as tightly as you choose, if you need to, without fear of
wasting your wingies, and b) the TBM carries a long-range torpedo,
so you may never come into the automatic acks firing range (1600
yards), or not even into the icon visibility range (3600 yards for
the low-flying aircraft) from your target.
Follow the pattern and the procedure described in section "2"
above, except that you can extend the "crosswind" section of the
pattern up to 40 seconds or a bit more (~4000 yards) to take
advantage of TBM's torpedoes' longer range, with your dropping
angle being 41 degrees instead of 36. Extending the "crosswind"
section will take you extra 20 seconds (10 there and 10 back) or
more but, in return, it will also make you safer from fleet's
127mm human acks and may prevent enemy's gunners from seeing your
icon altogether.
Alternatively, you can modify the "Right angles" pattern in the
following way:
As the TBM is not a formation bomber, you can make your turns much
tighter than what is described above, so:
When
in the "upwind" section (i.e. coming from the stern), start a
tight turn into the attack course when the target is at the
relative bearing of 90+41-10=~120 degrees of the relative board;
in other words, you go at the course parallel to the target's
course, look at the target (right of left view), and turn 90
degrees into the target (into the attack course) as soon as the
target is at the relative bearing of 10 degrees of arc closer to
the screen center than the 41* aiming reticle (its about twice the
distance from the 41* reticle to the screen edge).
When in the "downwind" section (i.e. coming from the bow), start a
tight turn into the attack course when the target is at the
relative bearing of 90-41=~50 degrees of the relative board; in
other words, you go at the course opposite to the target's course,
look at the target (right of left view), and turn 90 degrees into
the target (into the attack course) as soon as the target is
aligned with the 41* aiming reticle.
The rest is as per section "2" above.
One more thing to take advantage of in a TBM: as you do not have
wingies, you can make your drop from a very low altitude (50 feet
or even less). Remember: the lower you are, the smaller adjustment
you have to make for the time it takes the torpedo to reach water;
hence, the better accuracy you get.
Some advantages of the method: If you are attacking alone in a
TBM, and there are no enemy fighters nearby, the long-range
very-low-altitude attack gives you a good chance of hitting and
escaping as you have both good accuracy and stealth: the fleet's
gunners never see your icon when you are low and far away; they
may never realise a drop has been made.
4. The "Dagger" attack in a TBM.
It is designed for TBM's only (as the title implies).
This method is rather an exercise in prowess than a practical
tactic (at least when you are the only attacker), as the long
range extremely low-altitude drop described in item 3 above gives
you about 90% accuracy and is a lot safer, because the fleet
gunners may never see your icon at all.
This method is intended to take advantage of the TBM's torpedoes'
ability to be dropped from the altitude of <1000 feet and arm
successfully with water impact speed of <250 mph; these
generous limits let you toss that fish so it reaches water really
close to the target.
With this method of attack, it is crucial that you follow the
pattern precisely as described below (check it against the yellow
pattern line in Approach patterns): 30-seconds "crosswind" section
of the pattern; turn into the "upwind or "downwind" section (turn
B) at 30 degrees of banking without using the rudder; then, if you
are approaching from the stern (from the "upwind"), turn into the
attack course (turn A) when the relative visual bearing to the
target is about 92 degrees, i.e. you keep your heading parallel to
the target's, look at the target (look left or right), and start
the turn A when the target has just passed through the center of
the screen; or, if you are approaching from the bow (from the
"downwind"), turn into the attack course (turn A) when the
relative visual bearing to the target is about 51 degree, i.e. you
keep your heading 180 degrees opposite to the target's, look at
the target (left or right), and start the turn A when you see the
target between the cursor (that you have previously put at the
aiming mark of ~33 degrees of the respective board for the
"dagger" attack) and the edge of the screen; the altitude of drop
is 900 feet and the speed of drop is 200 mph (in level flight).
When in the attack run, drop as soon as the TBM "dagger" reticle
(=your cursor on the screen) aligns with the midships of the
target. You should see your target has just started firing the
automatic acks at you at that moment. As the torpedo covers a
significant portion of the distance to the target before reaching
water (i.e. flying at 200 mph), it is essential that the drop is
made from the particular distance (in contrast with other methods
of attack), that is why following the pattern is essential.
Offline practice is recommended so you are about as perfect as can
be in following the pattern; it can also help you learn to "see"
and "feel" the range to the target so you can exercise that attack
without using the pattern (be warned: it may take hours to hone
that method to perfection).
The advantages of this method (from offline experience) are: the
escorts' automatic acks' accuracy does not seem to be good enough
to achieve any hits on you during the attack (the issue of "bad
luck" discarded here). After the drop, you have a wider altitude
margin for evasion, e.g. you can make a half-split-S to change
your heading sharply. The other advantage is that your torpedo
flies towards the target for 7.5 seconds from that altitude,
covering >700 yards in the meantime. It takes the torpedo less
than a minute (about 52-54 seconds, to be precise) to cover the
remaining 1000 yards, allowing the enemy even less time to turn
the fleet away than if you were attacking with the fast torpedoes
dropped low at the range of about 1600 yards.
Anticipated online tactical limitations: unless you make a zoom
climb to 900 feet of altitude from "below the radar" altitude just
prior to attack (after the turn B), it is very likely that enemy's
fleet gunners have traced your radar dot and are getting ready to
shoot at you as you approach. Probably it is easy to aim a 127mm
AA proximity-fuse cannon at a single target ~2000 yards away
moving at the altitude of 900 feet and at 200 mph not directly at
you. Or, may be not. This leaves to be investigated.
Generally, as for now, I suppose this method can be utilised for a
co-ordinated attack to restrict the target's maneuverability and
distract the fleet gunners' attention from the low altitude
attackers.
Range finding:
When in a PT:

With
the maximum pilot's zoom-in, the CV's visual representation turns
from the low-resolution to the high-resolution model at the range
of 4800 yards, and the CA and DD turn to the hi-resolution model
at the range of 3000 yards. This fact can especially be used to
your advantage when aiming the rockets (see "Aiming PT's rockets"
below)
With the maximum pilot's zoom-in, CV's overhanging deck becomes
visible from time to time starting at the range of ~6100 yards. If
you are in a PT and your attack course is 90 degrees angle-on-bow
of the target (i.e. your attack course is perpendicular to the
target's course), seeing the overhanging deck of a CV means you
are almost within the PT torpedoes' range: you may drop in a few
seconds, if situation is urgent; if your aim is good, expect a hit
in a bit less than about 4 minutes (PT torpedoes' maximum travel
time).
When in a bomber with the fast torpedoes (Ju-88, Ki-67, B5N):
as soon as you see the first tracers from the closest escort
(firing at you), you are within your torpedoes' range of the
fleet's center.
(See also the "tricks" part of this text for advice on "extending"
the torpedo range)
When in a TBM (slow torpedoes) bomber, you can attack from the
longer range. This gives you some time to observe your target and
estimate the range.
The ships' wakes become visible from about 8000 yards away.
Aiming PT's rockets:
With the current PT rocket bombardier view being a complete blank it is no wonder most players simply toss all of the rockets in the general direction of the enemy or not use them at all. This reduces the attacking potential of a boat against the fleet by about 1/6th, as the punching power of a salvo of rockets (considering their dispersion) is about equal to one torpedo or 3/5th of the 40mm gun ammo capacity.
Following are the ways of putting the PT rockets into good use.
Inspect the lilac-coloured marks in the Torpedoes map. The left-hand scale is for a stationary boat, the scales on the right and in the center are for a boat travelling at the maximum speed. I found out that the rockets' range is greatly affected by the fact if the boat is stationary or moving. Against expectations and logic, the range of the rockets launched from a fast moving boat is shorter (by about 2/5th) than that of the rockets fired from a static position. Hence, 2 different scales.
The scale on the left (for a static boat) can best be used for aiming ground objects, or for setting an ambush for enemy's fleet or PT's, when the target is heading your way and you are not moving (which also helps you to get rid of that ever-so-visible wake).
In most cases, however, you will be moving full speed, so you will use the scales on the right and in the center. Make sure you always use the correct zooming for the particular scale: zoom default (NOT the max-in) for the scales on the right and left, and no zoom (normal view) for the scale in the center.
The scale on the right can be used with any kind of target but it was particularly designed for attacking secondary ships and PT's.
As the only occasion during an attack on a ship when you know the range for sure is when the ship has just passed through the high-low resolution transition threshold (see Ranges for details), I suggest you use the following method of aiming:
 1.
If your target is a CA or DD, use the right-hand scale (zoom
default) and prepare your aim (at 3000 yards) in advance. To do
that, first put the mouse cursor at the
3000defaultzoom-4800nozoom line at the zero bearing;
alternatively (and more simply), with zoom off, bring out the
clipboard (esc key) and put the cursor at the spot shown in
picture right. . Make sure you do not move the cursor any more
after that. Hide the clipboard. To Aim (at 3000 yards), turn
zoom on and make it default (check "setup/keyboard mapping" for
the respective keys), then elevate your rockets till the cursor
touches the horizon from below. Your aiming is ready. Make sure
you do not change your aim elevation any more until your rockets
are launched; you can move the cursor now, but I suggest you
keep it in place, just in case anything goes wrong and you have
to aim again. Now steer towards your target somewhat ahead
of it (by about a hull's visible length or less from the
midships to allow for the rockets' travel time of 9 seconds and
the minimum duration of the full salvo of 4 seconds; make the
duration minimum by typing ".delay=0.05"). As soon as you are on
the attack course, open the bay doors, hit the free-view key
(check "setup/keyboard mapping" in the AcesHigh clipboard for
the particular key), bring the horizon to the center of the
screen by adjusting your view uo and down (do not move your
joystick up or down!), and increase the zoom to the maximum-in.
1.
If your target is a CA or DD, use the right-hand scale (zoom
default) and prepare your aim (at 3000 yards) in advance. To do
that, first put the mouse cursor at the
3000defaultzoom-4800nozoom line at the zero bearing;
alternatively (and more simply), with zoom off, bring out the
clipboard (esc key) and put the cursor at the spot shown in
picture right. . Make sure you do not move the cursor any more
after that. Hide the clipboard. To Aim (at 3000 yards), turn
zoom on and make it default (check "setup/keyboard mapping" for
the respective keys), then elevate your rockets till the cursor
touches the horizon from below. Your aiming is ready. Make sure
you do not change your aim elevation any more until your rockets
are launched; you can move the cursor now, but I suggest you
keep it in place, just in case anything goes wrong and you have
to aim again. Now steer towards your target somewhat ahead
of it (by about a hull's visible length or less from the
midships to allow for the rockets' travel time of 9 seconds and
the minimum duration of the full salvo of 4 seconds; make the
duration minimum by typing ".delay=0.05"). As soon as you are on
the attack course, open the bay doors, hit the free-view key
(check "setup/keyboard mapping" in the AcesHigh clipboard for
the particular key), bring the horizon to the center of the
screen by adjusting your view uo and down (do not move your
joystick up or down!), and increase the zoom to the maximum-in.Now observe your target closely and launch the whole salvo (or part of it) as soon as the target changes into the high-res model. The moment itself is very noticeable as you will see the tail crane and the forward turret #2 pop up in the cruiser or the mast become visible in the destroyer as well as some minor parts.
The rocket salvo will cover about the same area near the target, whether it is 2 or 5 thousand yards away, so, with good aiming, long range seems to be as good as short one, except for the longer time it takes the rockets to get there. However, if you think 3000 yards is too far, or missed the right moment and do not want to turn and go around, it is possible to have a good aiming at a smaller range, like, 2000 yards, the only limitation being that you can only aim the closest ships in the fleet's formation this way or else you will come into the target's smaller acks firing range (~1600 yards=1 mile), and they are dead accurate.
With all the 3 engines intact and with no wind, you boat covers 1000 yards in 43 seconds (see "some figures" below). Make your aiming as required for the range of 2000 yards, keep going, and count those seconds.
If you are attacking from the side, when the target's own movement does not affect the range very much, launch in 43 seconds or a bit less after the target has turned into the hi-res.
If it is a straight head-on attack, and the target is moving at its standard speed of 34 mph, the range will decrease down to 2000 yards in about 25 seconds (relative speed=47mph+34mph=81mph=39.6yds/sec; 1000/39.6=25 seconds). In the head-on attack, you need to turn 180 degrees immediately after the launch to avoid running headlong into that 1600 yards area.
If you are in the straight tailchase for the target, the range will be decreasing by 47mph-34mph=13 mph=6.3yards/sec so it will take you about 1000/6.3=159 seconds to close the range down to 2000 yards (with you counting them seconds aloud while gazing at the display with the stopwatch ticking at your ear and scaring the hell out of your significant ones and pets, and the mental ambulance tearing through the dark streets, siren roaring, to bring some IMMEDIATE help to yet another gamer). Come on, will you really bother? Launch at 3000 and forget.
2. The scale in the center is designed particularly for aiming the CV. It is to be used with no zoom (normal view). Prepare your aim in advance similarly to the procedure described in "1" above, except for the fact that you have to aim for different ranges depending on whether the target CV is heading towards you, away from you or across your course.
If you are attacking from the side, the range will stay essentially the same 4800 yards (hi-low resolution threshold), so use the 4.8 mark. The aiming point is, again, about a hull's length from the midships towards its bow.
If it is a head-on, use the 4.5 mark; ; if it is a tailchase, use the 5.1 mark (it takes rockets some 18 seconds to reach the target from 4800 yards away; meanwhile, the target will move away 300 yards from its initial 4.8 kiloyards position). In both the head-on and the tailchase attack, you aim directly at the ship's hull or very close to it.
You can determine the exact spot by counting 18 seconds and checking how much the target has drifted across the screen.
In a tailchase, you have the option of putting the launch off for as long as you wish, e.g. to make some trial single shots before launching a salvo, as you can keep the target at the same distance by going the same speed with it.
In any case, launch your rockets as soon as the CV turns into the hi-res model.
3. If your target is a hostile boat, you will see the range indicator which makes aiming pretty straightforward: just launch your salvo at the range you see, spreading them a bit into your target's heading (towards you, away from you, or across).
If you want to be able to kill such a small target with less than the full 16-rocket salvo (sniper's ambition, eh?: 2400 bullets=2400 pilot kills, potentially:-)), bring out a calculator in your head: note the range ("R" in kiloyards) and aim at R if the target is moving across your course, or R+(R/15) when in a tailchase, or R-(R/15) when in a head-on. R/15 is the approximate ratio between the speeds of your target and your rockets. For example, R/15 for the range of 3 kiloyards is 200 yards, so you will want to aim at 2800 to hit an enemy PT going full speed towards you, and launch when the target is 3 kiloyards away; alternatively, you can aim at the range of 3 kiloyards and launch when the target is 3.2 kiloyards away. With good aiming, half of the salvo (8 rockets) has a good chance of doing the job.
It is easier to kill boats with the 40mm or small calibre guns, though, if you are a better crackshot than your opponent. 40mm is the all-best option: turn away from the enemy while still out of the 1600 yards' range of his smaller guns and use that deadly 40mm on him. He can not aim his own 40mm straight ahead, so the running PT has the advantage here.
Some tricks&advice:
If your last sortie was in the "gun ship or field" you retain the x9 zoom for the pilot's view in the subsequent sortie (until you switch to a gunner's view). You can exploit this bug for a PT sortie. With the x9 zoom, you can easily achieve the perfect torpedo solution from any distance. The downside of it is that if you want to keep the x9 zoom to enjoy the visibility you do not have the regular x3 pilot's zoom to aid range finding, and the x9 zoom is very misleading as to the range. Until you learn to estimate the approximate range with no zoom or with the x9 zoom, you may have to switch to the gunner's view and back after you have aimed in order to get the range to the target.
If you are attacking with PT torpedoes from the position off to a side and ahead of the target, seeing a DD and/or a CA turn into the hi-res model when viewed with the maximum pilot's zoom-in (see Ranges and the part on Range finding above) means you are well within PT torpedoes' range. If your aim is good, it is time you have launched you torpedoes, unless you want to be 200% sure of a hit. Moreover, you are soon going to enter the firing range of the closest DD's smaller acks (estimated at ~1600 yards): see the speed data in the "some figures" section below. If that happens, launch immediately, turn away from the firing ship and zigzag. With luck, you can escape. Fortunately, fleets will not use any long-range acks (that is, larger than 20mm) against PT's. However, if there is a decent (or any, in fact) human 127mm (or even 40mm) gunner in that fleet and he notices you at such a small range, you are only going to live as long as it takes to make a couple of shots at best. If the 127mm acks are unmanned, though, or if you have not been noticed (yet:-)), you can as well use your own 40mm gun, which has quite an impressive range of about 6000 yards (!). Luckily, the 40mm tracers can not be seen by other players online. About 150 rounds are usually enough to kill a secondary ship.
You can estimate the target's course accurately when in a PT by going 34.5mph (RPM=20.1 without wind) and turning parallel to the target's course. Observe the target and turn against the direction of the target's drift until it stops. Unfortunately, the PT's flat compass is bad (to put it mildly), so you may not be able to advise your mates on the exact figure of the target's heading, but you can utilise your knowledge about the target's course in your own attack: put the mouse cursor to the 41 degree mark, look 90 degrees to the target (right or left) and go full steam ahead or reverse without any turning until the cursor aligns with the selected target (that would mean that you are in the vertex of the right-angle torpedo triangle, and your target is in its other vertex). As soon as this happens, make sure you are in the forward gear and turn into the target until the cursor aligns with it in the forward view. If you are within the torpedo range, toss your fish. If the target is out of range, go straight at 39 mph until the range is achieved or further, then launch.
With the small CV fleet (the most common in the game: 1 CV, 4 DD's, 1 CA) you can do without the accurate "constant bearing" aiming. Alternatively, you can maneuver until the target looks as in here, then turn into the target CV until it aligns with the 41 degree mark for the respective board (right or left) (again, you should have moved the mouse cursor to the desired spot beforehand). If the range is good, drop 3 torpedoes for the CV then turn towards the target's bow until the CA is almost out of the screen (in other words, the aiming angle for the point somewhere in the forward part of the CA's hull is 45 degrees, that is, the edge of the screen) and launch the last torpedo. This method gives you reasonably good accuracy. Besides, this method may be your only option if one of your engines has been damaged, as it takes a lot more trouble to stabilise the speed and heading of a PT with one engine dead. If you have two dead engines, you can not maintain 39 mph at all.
If you are not quite sure of your aim, spread you torpedoes slightly against the target's hull. Three out of four torpedoes may well hit.
If it is only secondary ships that you are aiming (any secondary ship takes one torpedo to be killed), go into the position aside of the fleet and somewhat forward of it at a medium range, aim the forwardmost ship with the "constant bearing" method (be as accurate as you can), launch the first torpedo then chop throttle so you almost stop or you may even hit the reverse gear keeping the throttle at full and go backwards for some time (without any turning) to move further away from the fleet's acks, just in case, and wait till the next target in the fleet aligns with the cursor. Keep in mind that the torpedo always goes in the vector your PT is going, so make sure you are not in the reverse movement when you launch, as your torpedo will then go backwards! Launch your torpedoes one by one. Be sure not to switch to any other view though, or move the mouse cursor, until all the torpedoes are expended, lest you lose your aim. This method has an additional advantage: when your boat is stationary, it has no wake, so you are very hard to see from the air at the short distance.
If the fleet is big, you may want to find such a position that two or three ships in the fleet overlap, before you start aiming. This way, you get one firing solution for two or three targets.
Be advised that it takes 3 torpedoes to kill the fleet's primary ship (be it a CV, CA or even a DD), and 1 torpedo (or ~150 rounds shot from the 40mm gun, or about 8 rocket hits) for any secondary ship (including a CV). So, the PT's ammo is enough to kill 3 ships (1 primary) with certainty. With some luck, you can damage or even kill one more secondary ship with your rockets and the rest of the 40mm ammo (240 rounds total): see the part on "Aiming PT rockets" for details and "PTs_firepower" (below) as an illustration.

There
is no need for you to switch into the "Torpedoes" map every time
you aim. Instead, adjust your pilot's seat so the aiming marks (36
or 41 or 0 degree, or whichever) are against some noticeable spots
in the cockpit art, and memorise those spots. It does not
necessarily have to be the forward view. Any other view (down,
forward down, forward up, up etc.) may contain some good reference
marks you can put your mouse cursor at prior to attack. E.g. the
PT's pilot's dashboard view (forward down) can be adjusted so it
provides some good 41 and 0 degree marks for aiming; with the
aiming device properly calibrated, the 4.8K-3K rocket-aiming point
is against the clipboard spot shown in Aiming by clipboard, when
the clipboard is viewed with zoom off; the gunner's reticle's
center is exactly 0 degrees (center of screen); and so on.
In planes, it is worthwhile to have those reference points in as
many views as possible as during dusk hours some of the views can
be too dark to see. Use the "move up/down/left/right" and "save
the head position" keys to adjust your pilot's seat in the
respective view.
Additionally, you can improve your out-of-cockpit visibility
(sometimes significantly) by doing so, which holds true for any
plane/vehicle you use (note: make your PzIV/Ostwind driver's head
stick out of the hatch permanently by using this technique). The
"move up/down/left/right" keys can often be used in-flight to
clear some blind spots in the cockpit, e.g. during banking while
approaching the target.
A General advice is to learn to use your windows control
panel/video card properties to raise the D3D gamma (brightness) so
you do not lose your vision during dusk or night hours. With many
video cards (including my current RIVA TNT2), there is a good
reason you do it as many D3D applications are normally too dark
(much darker than the desktop).
If you are flying a formation of Ju-88 or Ki-67, the default
formation is the Vee, so your torpedoes will go in the Vee as
well. However, this can be changed in several ways:
1. The wingie drones will not go below some 200 feet of altitude,
so if your leading plane's altitude at the drop point is less than
about 100 feet, the torpedoes will go in the inverted Vee, as your
torpedo will reach water earlier than those of your wingies'.
2. If your altitude is about 130 feet, the torpedoes will go in a
straight front.
3. If you lower your gear prior to the attack, your wingies will
form a trail behind you, so the torpedoes will go one after
another. Be sure not to go too low or slow though, as one or both
of your wingies may choose to land (on water) instead of following
you. Also, watch that you do not damage your landing gear, as well
as those of your wingies, by going too fast (when flying the
Ki-67, especially).
4. If you order your wingies to change a Vee for a trail (by
hitting geardown) or vice versa (by hitting gearup) and drop some
1-1.5-2 seconds after that, while your wingies are still changing
formation, your torpedoes will spray slightly.
5. If your formation is a trail (the gear is down) and you are
turning, the torpedoes will have a moderate spray outside your
turn. If you are turning into the target, and your aim and timing
are perfect, the torpedoes will hit the same point of one ship one
after another.
Take the habit of checking if your wingies have formed on you
before you drop as they will go outside some tight turns. When
they lag behind, they run full throttle to catch up with you thus
travelling faster than 200mph so their torpedoes may not arm or
they may damage their landing gear if the formation is trail. When
I am flying a formation, and need to turn, I bank 30 degrees
(viewing the artificial horizon) and keep the VSI (vertical speed
indicator) at zero. This way, the wingies stay with me in a turn.
There is a way to "extend" the effective torpedo range:
When in a Ju-88, Ki-67 or B5:
The absolute limits of a torpedo drop for the fast/short range
torpedoes seem to be as follows: 1. A torpedo will fail if dropped
from an altitude of 460 feet or above. 2. A torpedo will fail if
it is travelling at a speed of 200 mph or above when it reaches
water.
So, if you drop from the altitude of 400 feet at the speed of 175
mph (TAS), the torpedo will arm normally. It takes a torpedo about
5 seconds to reach water from the altitude of 400 feet, during
which time it travels at the plane's speed. Meanwhile, it will
cover about 420 yards. That makes the fast torpedo's range
2300+420=2720 yards, and you may already be turning away from the
target at that radius from it when your torpedo reaches water.
That will give you better chance of bringing both your sluggish
wingies home undamaged. Naturally, you have to adjust your aim
accordingly, i.e. drop 5 seconds before the desired bearing to the
target (36 degrees) is achieved, or aim at the target's stern or
behind it. The downside of this method is that you have to drop
shortly before you are going to see the first tracers, so you must
be good at guessing ranges.
When in a TBM:
The absolute limits of a torpedo drop for the slow/long range
torpedoes seem to be as follows: 1. A torpedo will fail if dropped
from an altitude of 1000 feet or above. 2. A torpedo will fail if
it is travelling at a speed of 250mph or above when it reaches
water.
So, if you drop from the altitude of 900 feet at the speed of
200mph (TAS), your torpedo will arm normally. It takes a torpedo
about 7.5 seconds to reach water from the altitude of 900 feet.
During this time the torpedo is travelling at the plane's speed so
it will cover >700 yards. As the TBM's torpedo already has a
range of 4500 yards, I do not think there is any need to extend
that range even more. Instead, this trick is best used when making
a co-ordinated attack on a defended and maneuvering target from
the short range (see "TBM dagger attack" section in "Air attacks"
above). If you drop when you see the first tracers from the
automatic acks, your torpedo will reach water about 1000 yards
from the target, and will impact within 60 seconds, leaving your
enemy very little time to start turning and evade the hit.
You do not need to "extend" the range of a TBM torpedo when
dropping from a long distance as automatic acks are not a problem
that way. Rather, drop from the lowest altitude possible but
achieve good accuracy instead. There is a big advantage to a
max-range low-altitude TBM attack: enemy fleet gunners (and,
probably, fighters) never see your icon so they are only alerted
by an incoming torpedo, if they can spot it in time.
It is possible to hit a ship with air torpedoes head-on (use the
trail formation) but the accuracy of such an attack is usually
lower than that of the cross-course method, so I would not
recommend you do that unless you can not attack in the regular way
for some reason.
It is absolutely useless to drop your torpedoes at the target from
stern as the fast torpedoes will only close the distance to the
target by about 900 yards when in tailchase, and the slow ones
even less so.
It is a good idea to do some "recon" of the terrain offline prior
to going to the online arena. Find the fleets' spawn points, their
ports' allocations, probable routes, distances and headings,
passable straits etc. I would also strongly recommend finding out
which is the main ship of each fleet (the one you have to kill for
the fleet to go back to its port). The main ship is the one you
find yourself in when moving into that fleet by clicking its icon
in the clipboard map. Also, (as I have said before) a reasonable
piece of preparation is making a practice attack offline against
the main ship of some unconventional types of fleet (e.g. a fleet
of 8 DD's in a circle), taking a snapshot of the target fleet as
seen from the drop point and inspecting it closely to find some
clear visual reference for aiming. You can also take a snapshot of
the target from directly above to get the general idea of its
formation. See Small
CV 36 degrees view and Small
CV 36 degrees chart as an example. This will help you
to be ready to attack any moment without finding the target's
course and calculating the attack course. Personally, I always
attack the small CV fleet by visual reference now.
^^^^^^^^^
A note on determining the target's speed:
Currently, in AH, you know the target's speed exactly most of the
time. I consider this indents into the realism, as the real-life
attackers could never be sure about that essential bit of data
while attacking fast targets. This very uncertainty, in my
opinion, prevented the British Swordfish torpedo bombers from
hitting the German battlecruisers during the "channel dash"
in February, 1942.
To make torpedo attacks 100% realistic (in terms of the attack
data), a method must be developed to determine the target's speed
with enough accuracy by visual observations from the air. The
accuracy required should be within 2-3mph. I have not yet been
able to think of any usable way to achieve that. I still wonder if
it is altogether possible in the game. So, if someone can work out
such a method, I would greatly appreciate being advised upon that.
Some figures:
Fast torpedoes (Ju-88, Ki-67, B5N):
range: 2300 yards. Travel time: 1 minute 40 seconds. Speed: 47 mph (~1000 yards in 43 seconds).
Slow torpedoes (PT, TBM):
range: 4570 yards. Travel time: 4 minutes. Speed: 39 mph (~1000 yards in 53 seconds).
PT:
Maximum speed: 47 mph forward (~1000 yards in 43 seconds), 23 mph reverse.
Fleets:
Standard speed: 34.5 mph (~1000 yards/minute).
Maximum speed: 41 mph (~1000 yards in 50 seconds). Fleets travel at a speed higher than standard during some 5-7 or more minutes after making sharp turns (e.g. 180 degrees); some ships in the fleet's order will accelerate after any turn; apparently, to catch up with the imaginary allocation point.
Viewable area:
In normal view (no zoom), the screen covers an arc of 90 degrees vs. 30 degrees in the maximum zoom-in in the pilot's view (x3) and 10 degrees in the maximum zoom-in in the "gun ship or field" view (x9). The latter figure (x9) I am not absolutely sure of. Besides, those two figures (x3 and x9) may only be applicable to the arc coverage of the screen, but not to the ranges. E.g. you can see the destroyer's mast from about 500 yards away with no zoom, from 3000 yards away with the maximum pilot's zoom-in, and from 14000 yards away with the maximum gun ship zoom-in. That makes the ranges ratios more like x1, x6 and x28. This issue may be cleared later, if need be.
Conclusion:
Have you finished reading this?
Wow! You definitely have the patience to be a good torpedo bomber!:-)
Do you happen to think I am too particular to details, especially with those approach patterns?
Hope not. Well, in case you do,
1. I have never said it was going to be easy, and,
2. Recently, I have searched the AH forum with "torpedo" as the keyword. The first link I got was a (typical, I regret to say) story going "how much fun we had when the whole of our squadron bravely (and aimlessly) died in the fleet acks within 30 seconds after an hour's search. Why on earth didn't we score a single torpedo hit? Bad luck?... Yup! Nothing but bad luck! Nxt time, mebbe..." Nope. It is not bad luck, but the lack of preparation. Then, as you may have noticed, the (detailed) torpedo attack methods described above contemplate hitting the target as well as staying alive.
Why not have fun AND be effective?
Effectiveness:
There are other methods of attacking marine targets in AH than air/PT torpedoes attacks described above. Those are: hi-alt level bombing, low-alt level bombing, strafing/air rocket attacks, dive bombing, shore battery/fleet guns shooting. One by one: hi-alt bombing takes a lot of time, with your icon alerting and attracting every enemy around; and the accuracy/impact is not good, in most cases; a shore battery has its cone of fire that is easily avoided; fleet guns battle is a matter of luck, that is, you exchange hits with the enemy's fleet; low-alt bombing and other air attack methods mentioned are, in essence, "kamikaze" attacks. You may eventually kill the main ship, but it is going to take dozens of attacking planes to die before that happens. With torpedoes, you can achieve that goal without any losses (see below to get the idea of what I regularly do to the enemy's fleet). There is no "good luck" in it. I do not mean to say there is no bad luck sometimes but...you know what I mean.
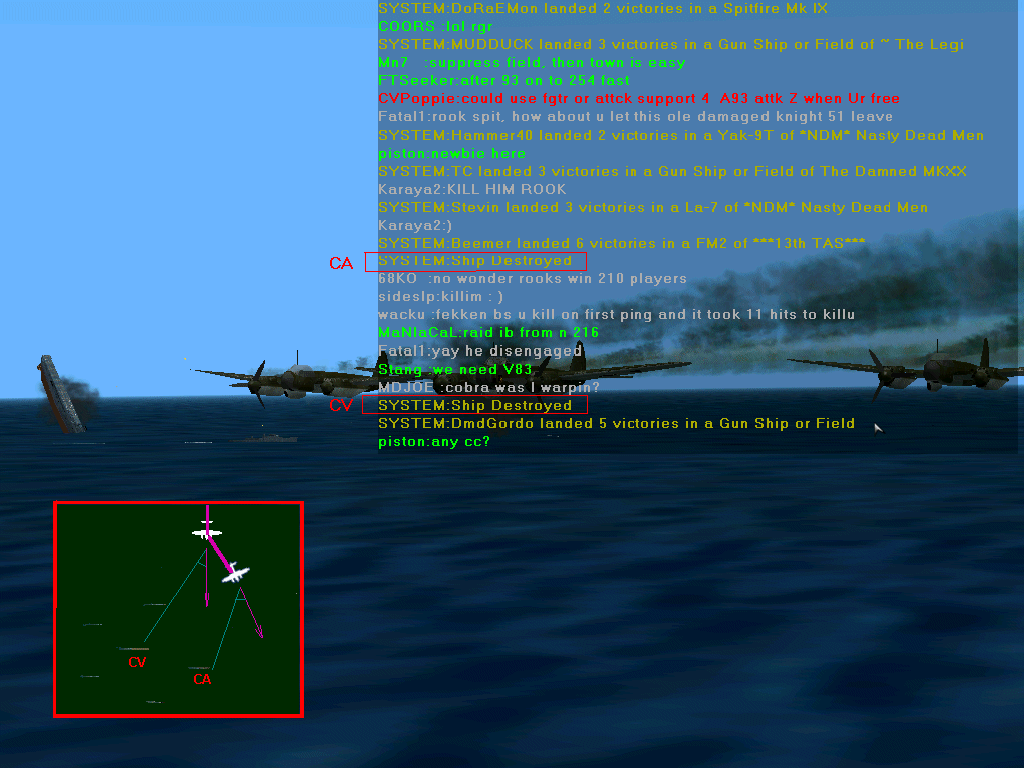
Fun:
Since I started working out torpedo tactics I find fighter
missions...well..boring:-) There's nothing as dynamic and
thrilling (and useful for your country) as a successful torpedo
attack, as you take the whole mobile enemy field away.
In a level bomber, you can achieve something that big, but only
when you do something really strategic, like taking out enemy's
HQ.
There is no way you can be that useful in a fighter.
After all, air force is there for moving mud and fighter arm is
only a defensive appendix to it.
One more important thing: flying, navigating and aiming in a
low-level bomber is good flight/3D-thinking practice.
My intention is setting up a "torpedo school" (project name is "a school of fish") to develop and practice group torpedo attack tactics in AH. It will be a rook squad, as I fly for rooks (unless someone gives me a good reason to change my country, e.g. there is another country's squad strongly determined to develop those tactics). After the training is completed, I have no objections against graduates going back to the countries they came from. My only aim is promoting torpedo attacks; giving any country an edge in marine warfare is not my aim.
HOME