
How to create skins in Aces High
This is a technical guide to creating skins for Aces High, geared towards beginners. There will be two parts, including the steps required before you start editing the graphics files, and including the steps required to edit the graphics files.
This tutorial is designed only to give the basic techniques to people. If you follow these steps you can put any rainbow-colored bitmap into the game and see it as a skin. The end result will be yours. Your skills with the editing program you use will determine the end result. However, following these steps should (hopefully) get you to that end result, no matter how it looks.
Getting the files you need to edit:
First, some of these steps may be redundant to HTC's write-up on their webpage. It is here: http://www.hitechcreations.com/ahhelp/skins.htmlI am typing up my own words and including images so you do not have to go back and forth between multiple resources to figure things out.
You need:
- Aces High installed and up to the current patch. If you have an older version the files you edit for your skin may no longer be the right files.
- Aces High hires texture pack. This can be downloaded here: http://www.hitechcreations.com/Flight-Sim/Flight-Simulator-Download/download-high-res.html. You need this installed to get the proper "templates" that you will later edit.
- A graphics editing program that supports layers, can edit in millions of colors, but export or save to 258-color (8-bit) bitmaps. I am by no means an expert on the choices, but Photoshop, Paintshop Pro, and GIMP, all support layers. GIMP is free, while PSP has a free trial period, and PS you must buy.
- AH Skin Viewer (you may not need it, but you may want it!). Can be downloaded from here: http://www.hitechcreations.com/World-War-Two-Games/Terrains/downloads-content-art.html
- AH Forum access. Create a user account on the AH forums. You can find the link on the webpage www.hitechcreations.com under the community link, or go there directly with http://bbs.hitechcreations.com/smf/index.php. You need an account for all the help you will find in the "custom sounds and skins" forum. You can get tons of help here, especially if you're just starting out. Also it helps to eventually start "in-progress" threads to get feedback on your current work.
Getting started:
Download the hi-res pack. Install the hi-res pack. When it is installed, start Aces High and go to the video settings. You need to choose "1024" in the texture resolution drop box.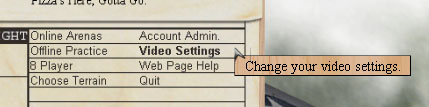

When you click okay when you are done, it will build the cache for 1024 resolution. If you already had 1024 set without the hires pack installed, it was not 1024. The files required for 1024x1024 textures are not included with the default game. They max out at 512x512. Even if you had it set to 1024, but you didn't have the hires pack installed, you still need to install it and let the cache be rebuilt.
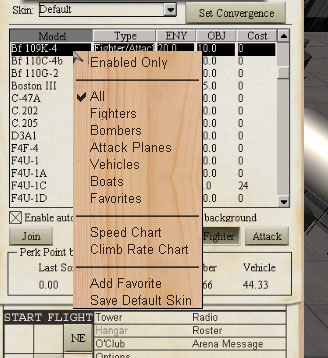
This may take a while depending on your system. Let it finish. When done, go offline. Go to the hangar, and pick a plane. Pick the plane you wish to practice on, or wish to create a skin for. Right click that plane's name in the hangar, and choose "Save Default Skin."
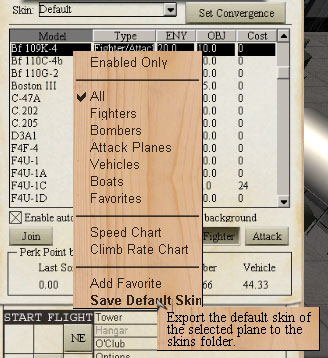
Exit Aces High. You now have extracted the default bitmap files. You can use these as a guide to create a new skin. There's still one more step before you can start your editing.
Go to the Aces High II directory. This is usually in your program files directory. Under HTC\Aces High II\skins you will now have a new directory. This will be the name of the plane you chose. For example, in the image above I chose the 109K-4. The directory I need to look for is named "109k4" inside this "skins" directory. It could be p47d25 or p40e or b17g or whatever you are looking for. It should be self evident.
The default bitmaps:
Don't edit these files. It won't screw up your game, or anything, but it's a major pain when you start learning to have to re-extract them all the time. You will copy the files you need later, but now you need to find which files you need.In the default directory there are more files than you need. Here's an example for the 109G-6 default files:
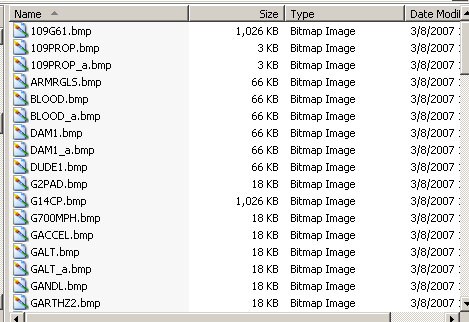
Everything the entire plane uses is in this directory. Everything from the pilot to the instruments to the exterior skin, to the damage and the prop blur, and so forth. I strongly suggest you don't go all-out, and don't plan on editing every last file there is. Skinning a plane is one thing, and skinning a cockpit is another, but a lot of these files you really shouldn't mess with (it's just not worth it).
Find the files you need. Start with just the external files. You can view the files if you like. Windows XP has a handy image preview tool to help you locate what you need. Often the file will have the name of the plane in it. For example, the file "109G61.bmp" in the previous picture is the main skin file for the 109G-6. The 1 on the end is in case there is more than 1 bitmap (in which case there would also be a 2, 3, etc...). If you eventually decide to work with cockpit files (most do not) the file G14CP.bmp would be the cockpit in this case. CP is cockpit, G14 is because the G6 and G14 share a cockpit. You will sometimes find similar versions of planes share certain bitmaps.
Go back to HTC\Aces High II\skins and create a new directory. Whatever the default is, add an underscore and a number. For example, 109g6 is my default, so I would create 109g6_1. For a p51d you would make a p51d_1, and so forth. The game supports up to 15 skins, and if you wished you could keep making more and more, from 109g6_1 to 109g6_15. Technical issues: Stick with the low numbers at first. When offline you will "overwrite" the other skins in the game. If you normally see 3 skins (not counting "default") when you're in the hangar, and do not want to overwrite them so that you can compare or get ideas, then take the number of skins and add one. If you have 3 skins, and wish to work on your own, create a directory with a "_4" suffix. However, do not skip numbers. If you have 3 skins and you jump to "_10" (or even "_5") I have found a skin might not show up in the drop-box. Please note the "overwriting" does not replace the online skins, and offline skins will not show up in any online arena. They only temporarily fill another skin's slot when you are offline.
Copy the files from your default to your new directory. Copy, don't move. Just the files that are required. If something goes wrong, you make a mistake, or save over a file, or lose a layer, you will want the original defaults again. For some older skins you may need 2 files for the aircraft, and perhaps another called "markings." It depends on the plane. Some of the older graphics setups have 2 bitmaps. When they do, they often split up the bulk of the file between the fuselage and the wings. For example the P-40E has 2 files, one named "P40EWNG.bmp" and one named "P40ESD.bmp" (WNG for wings and SD for side).
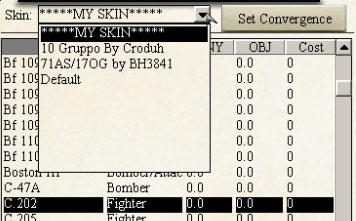
Before you go editing, there's one final thing that will eventually help you. Go into your _1 directory and create a new text file. name it whatever the default directory was called but with a .txt ending (i.e. if your default directory was the 109G-6 it would be 109g6.txt, or if you were working on a hurri1, if would be "hurri1.txt" -- even though it goes into the _1 or _2 or _3 directory, it never gets the _1 or _2 or _3). Open this file and put something you can easily spot in it. This is the text that will show up in the skins drop-menu when you go offline to preview your work. You can simply fill it with a row of 20 asterisks "******************" so you know which option to choose. If you over-write an existing skin but do not put this object.txt file (that's the name for this file, it's understood that the object is whatever plane you are working on), then it will still display the name of the other skin, even though it shows your bitmaps. The problem is finding which one you are working with if there are 14 others in the list. By adding this file you have no problems finding it. You can change the text later. Here's an example of this in action:
Note that if you are using the skin viewer utility, it does not use the object.txt file. It will have a drop-box to choose your plane with, and another to choose the directory of the skin you want (i.e. 109g6_1). You would simply choose the name of your working directory.
Editing the bitmaps:
Now you must edit the files. You start with a bitmap, and you must eventually end up with a bitmap, but there are many steps in between. It is imperative that you work with layers. You simply cannot create any decent-looking skin without layers.First the format: Your default files are ready for use in the game. They are 8-bit (256-color). Naturally this limits your color choices. You need to convert the file to RGB mode (millions of colors), then edit, and when you have enough progress that you wish to preview it, you export it or convert it back and "Save as..." an 8-bit bitmap.
I say "save as" because you should not save the 8-bit files over any file name you have been using for the RGB editing. Once you save as 8-bit you lose all layers and all your detailed color options, and you must start over from a previously saved file to recreate your lost work.
Create a layered file. In Photoshop (which I will use as an example because it is the software I use) I open the 8-bit bitmap, convert it to a RGB Mode file, and save the file as a PSD format with a new name. I will often use part of the default name. I will add a number or a letter after this. The numbers are major changes. The letters are often for minor changes, where I change all the colors on some layers, or combine certain layers into one, but want to be able to get the original layers at a later time (just in case). Here is an example of a hurricane skin I was working on:
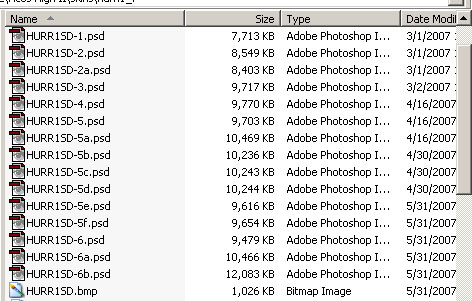
I started with -1, moved to -2 when I had some major changes done, then -2a with some minor changes, etc... Develop your own system, but do this so you can always go back to a previous step. Say you have some brown camouflage and some green, on separate layers. If you combine them for some reason, you can no longer go back and edit *just* the green, or *just* the brown. However, if you want to combine them (to run a filter or do something creative) go ahead. Before you do, save the file with them as separate layers (i.e. "-2a") then combine them and save as a new file name (i.e. "-3") -- so if you ever decide to go back to separate layers to change colors or whatever, you have that file ("-2a") and can easily do so by copying those layers into whatever the current file is. Use your common sense. You don't want to make it harder. It's much easier to make more files than it is to recreate hours of lost work.
Layers:
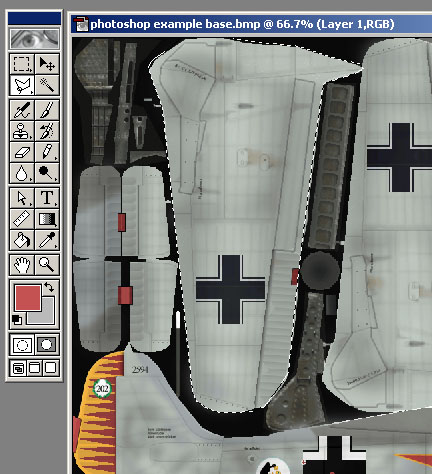
Create new layers for most new things. Put the original file on the background layer, and build upon it. Never edit the default layer. If you must edit something on it, copy the layer and edit the copy.Block out your areas. Create a new layer. Select the polygon select tool. On this new layer, select the wing, or the fuselage, or some major part of the skin. When in doubt go a little larger than the default, but try to be close. If you are off you'll have to go back and fix it, but that's easy enough to do. In this example I've started with the wing. Now take the paint bucket and fill the area on this new layer with some neutral color. I use a shade of grey or white. It doesn't matter which color you choose, these are not going to be your final colors.

Before you go any further, name the layer something that is easily recognizable. You will have many many layers before you are done, and you really need to be able to find what you want. For example, I would name this layer "STBD lower wing" (or PORT lower wing, or upper wing, or etc...)
Once you have all your major areas blocked out, and you wish to start coloring them in, here is what I would suggest. I would create a new layer, and select the previous one, but paint on the new one. In Photoshop, you simply control-click on that layer's thumbnail in the "Layers" screen, and then select another layer to paint on. The layers screen:
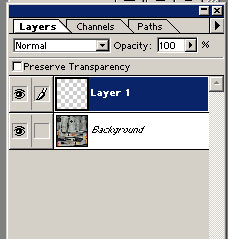
With simple anti-aliased paint bucket fills, you can have part of the original color show through around the edges. Not only does this detract from the final color choice, but it also is why I suggested a neutral color earlier. If you use an empty layer and the fill bucket, this doesn't seem to be a problem. Select the area you want, and fill onto a new layer and you won't see any of the old layer around the edges. Once you have enough progress, I would hide the original blocked out layer, and work on the new layer. Don't forget to name them as you create them.
Panel lines, and so forth.
Panel lines are usually an important part of a skin. Regardless of HOW you make them look, you need to know how to do them. I would suggest doing panel lines after you have blocked out all of your major components, but before you start the actual camouflage or painting. In this case let's use the default as a template. I have in the past, and you can easily, use other references and create your own panel lines, or correct mistakes you have found in the defaults, but it is good to know the basics. The final blending and opacity of the panel lines will be your call, but you need the pixels to work with. Once you do this, you can do anything you want with them.Hide your blocked-out layers, so that you can see the original default again. Create a new layer. Select the color of pure black (0,0,0 in RGB). Choose a pen or pencil tool and a brush size of 1 pixel. Now you trace the panel lines. Do your best. Some knowledge of the plane in question can help, but if you don't know too much about it, don't sweat it. If you have photoshop, there is a handy feature with the pencil tool. Click once where you wish to start a line, then let go (create a 1-pixel dot). Then shift-click where you wish to end the line. It will connect the 2 points with a solid line. Using either the pencil or the brush, you can alias the lines or not. I would suggest not. If you wish the end result aliased, you can run a filter to blur them, but it is better to have the unaliased layer to work off of. If you wish you can also make a copy of the panel lines layer, hide the original, and edit it that way. If you do not like the results, make another copy of the original and try again. The end result will depend on your wants and tastes, but this gives you options on the way to that end result. Once you have most/all of your panel lines in place, turn back on your blocked-out layers, to double check them. Like this:

Now we need to save the file properly to preview it. First, save your PSD (or whatever format you chose) with an iterative name (add a -1 or something to the end, make a new version). Then, how you do the following will depend on your software. All editing programs that support layers will allow you to flatten all the layers, somehow. In photoshop you can choose the menu Layers > Flatten Image, and it will ask you if you wish to discard the hidden layers. Choose yes to "discard?" because you don't want to see the hidden ones, just what you have showing. The layers are flattened, which is the first step. The second step is getting it into 256-color mode. Choose the menu Image > Mode > Indexed Color... and it will ask you the same "flatten image?" question (you can run this without flattening the image in photoshop, but I do not know about the other programs, so I have said to flatten the image then proceed). Then it will bring up a dialog box.
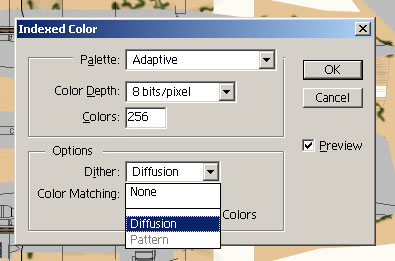
In photoshop, choose Adaptive palette, and choose 8-bits (which is 256 colors) and I would suggest diffusion dither, but you may experiment. This will give the best color range from photoshop's indexed color command. Once this is finished, select File, Save As..., and now you may over-write the default bitmap name (109g61.bmp, going back to the 109G-6 example). Now you are overwriting because you wish to preview this work. If saved properly (in 8-bit mode, using the proper bitmap filename) you should now be able to view the skin in game (offline) or in the skin viewer utility from HTC.
Alternately, the "Bright" plugin is highly regarded by some. If you have it installed, you can leave the image in RGB mode, and choose the menu File > Export > Bright... and give it a file name (you would overwrite the bitmap here). I don't trust the way Bright flattens my layers, so I flatten first then export, when I use it. For many cases, bright will produce a smoother 8-bit file than photoshop will, but sometimes PS creates a better image. It's up to you.
Common sense:
Enjoy! Now you know how to get the default bitmaps and how to edit them. Use your common sense now. If you have panel lines they have to go on top of the colors, etc. National markings have to go on top of the camo, but underneath the panel lines (in most cases). Use your own common sense in these matters.Submitting the skin:
When you are creating your skin, take periodic screenshots of the progress, and create a thread in the forums. The AH skinning forums can be found here:http://bbs.hitechcreations.com/smf/index.php/board,71.0.html
The forums is for peer feedback. Use the people on the forum to get tips or suggestions on how to do certain things. Or just to see if the way you did something makes folks smile or vomit (heh heh, that's a joke kid, make with the laughing!). Create a new post and let them know what the skin is, any basic info you have on it, perhaps a photo of your references or two, and some screenshots. If you are just starting out you may need to go back and forth many times. Don't get disheartened. I've personally seen several would-be skinners get upset at all the comments about their first skin. Some gave up skinning. It's not that hard. The problem is figuring out what works and what doesn't, and on your first skins there are going to be frustrating points. You don't have to follow all the suggestions given to you, but keep in mind a lot of the folks giving the suggestions might know a lot about skinning.
If you get to the point you feel the skin is complete and ready to submit for inclusion into Aces High, you will need to check out this page about submitting skins to HTC:
http://www.hitechcreations.com/ahhelp/skins.html
The "info.txt" file will be important. You need to include some of your own information so HTC knows who the skin is from, and some information on the skin itself. Now, how much do you put in? That's something that is subjective to every skin you make. I've had very brief info.txt files and some very long ones. It just depends on what you need to include about the skin. Before 2.06, for example, the old-format 109s mirrored the fuselage on both sides, so you could only use the number 8 (symmetrical both ways) otherwise one side of the fuselage would be backwards. Even if the normal plane number was "11" you had to put "8." These are the types of notes you need to let HTC know about, so if they see "Oh, the number's wrong" they will then know why it is this way.
Since it is so subjective, I will include a couple of examples, just to give you an idea of what my info.txt files look like. These are two of the less-detailed ones.
Info.txt for 2/JG3 109E-4
Info.txt for 9./JG54 109E-4
Put your own name and e-mail at the top. If you ever need to resubmit the skin later, or reference it to HTC, use the skin code reference# they give you later (when they start looking at the skin). I zip all my files, so I add a little table of contents at the bottom of the info.txt file to help HTC know what is what.
I'd suggest zipping the files together. Give it a name with your user ID, your plane name, and the plane type (i.e. "Krusty_109E4_9.JG54.zip"). In the e-mail where you attach the zip, I would suggest including a general description of the skin, note there is an attached zip file, or anything important. I usually paste the "info" chunk of my info.txt file into the body of the e-mail message, just for good measure.
Then, all you have to do is wait. I mean it, send it and FORGET it. The turnaround time is sporadic. You'll get an auto response that basically says "We've got your skin, we'll look into it" but this is not a confirmation that your skin has been accepted. Some time after that (this could be a long time) you will get an acceptance or rejection notice. Usually rejection notices have a brief reason describing why they have been rejected.
There you have it. That's how you make skins. Rather, that's the technical process for starting a skin and submitting a skin. Creating it is up to you. All the painting, manipulation, and details I've left out. That could fill volumes with the different philosophies. I wanted to avoid that (and/or include it in a separate webpage) for the sake of simplicity, and to avoid confusion for all the folks that ask "How do I create a skin?"
Now you know!
8/23/2012: NOTE: The submission process is undergoing changes. For first-time submissions you may still be able to do it this way. ALSO NOTE: This does not include bump maps, specularity maps, or any of the new features.