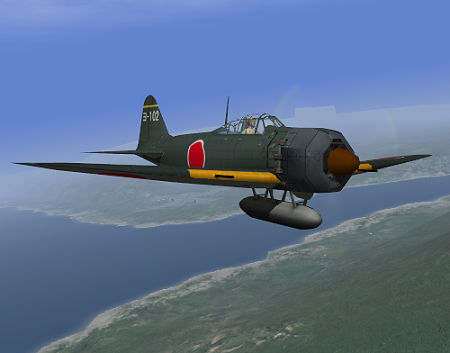
A6M2 "Zero"

Variant
of A6M
Type Fighter/attacker
Crew One
Aces High II loadout
options
Package 1
2x
Type 97 7.7mm machine guns, 680 rounds/gun
2x Type 99 Mark I 20mm cannons, 60 rounds/gun
2x Type 99 Mark I 20mm cannons, 60 rounds/gun
Options
2x 50kg
bombs
1x 300 liter drop tank
1x 300 liter drop tank
Aces High II Main Arenas
Typical perk cost 0
ENY value 40
Available on carrier yes
Overview
A early Zero model, it was introduced into AH at about the same time as a number of other like-era aircraft. It is an interesting plane with excellent maneuverability combined with good firepower. It should be more fragile and unprotected than the other Zero and far less than most planes in the MA though. The greatest liability it appears to have is a very low top speed and most altitudes, especially at sea-level.
To be successful
The ultimate turn-fighter it can absolutely dominate anything else in a pure turning fight. The agility is amazing even with full fuel (which is not necessary) this plane can wrap around in very tight circles and quickly pull in behind anything else. This turning comes at a pretty high cost though, more than a lot of people would be willing to pay.
The engine is very under-powered but with the light airframe does a decent job of pulling the A6M2 around. Unfortunately the top speed of almost everything you meet is likely higher than you, at least by a small bit. Top speed at sea level is only 275mph, less than the F4F-4 by a couple of mph but more than the Hurricane(s). Climb rate is a little low on the 2,600ft/minute side though it remains fairly consistent up to higher altitudes. Top speed is only 327mph range at 15K so you will never really be any sort of speed demon. Fuel range on the A6M2 is simply amazing, 47minutes on full internal with the option of a drop tank. Considering that the A6M2 has no WEP you will not burn the extra fuel for increased power and thus probably won't find yourself short on fuel. I would only load 50% internal for the average mission unless you need to fly a long distance.
Firepower is barely acceptable in a a pair of 20mm cannons and a pair of 7.7mm machineguns. The cannons only have 60 rounds/gun and the ballistic properties are very poor so you need to wait for high quality shots and ensure your convergence is set appropriate to close range combat (D250 or less). It is important to be thrifty with your cannon use as once they are dry the remaining pair of 7.7mm guns are unlikely to hurt most opponents without a very long firing opportunity. Consider yourself out of ammunition once your cannons are dry and only use the 7.7mm in self defense. If you can saddle up then that will be your best opportunity for the easiest shot.
As mentioned in the intro, the A6M2 is the tightest turning plane in the game, it can absolutely turn on a dime and loop like crazy. It's almost hard to fly at times because the turn rate is so great it doesn't give you time to prepare for your shots. The enemy aircraft come into view so quickly that you often don't even need to pull full deflection on the controls. This can actually complicate firing if you over-lead aircraft or turn vastly inside their turn radius. Roll rate is fair, not great, although at the low speeds you tend to fight opponents it is unlikely that they will be much/any better. Dive performance is good, surprisingly, as I think it might be an error in the flight model. The A6M5 model suffers badly in any sort of high speed dive over 350mph but the A6M2 does not and can dive quite well. Diving is a good way to catch up to low opponents who are trying to run.
The worst thing about the A6M2 is that it is very fragile and almost completely unprotected from enemy fire. There are no armour for pilot protection or to protect vital areas of the aircraft. A plane armed with .50cal is likely to tear you in half and instantly kill the pilot if given even half a chance to fire on you from the rear.
Offensively, I would try and get slightly above an opponent, or find one that is committed to a turn-fight or turn-defense. Drop in and simply out-turn them, saddle up, and let the cannons find their mark. You should be able to almost continuously lead turn anyone at any time you desire so even if you make a mistake or pull fewer G's at the time of you shooting, you should be able to almost instantly saddle up again. All the turning is bound to make you vulnerable to team tactics if there are multiple bogies, but your turn-rate is likely to make any attacks on you very difficult.
Defensively, the A6M2 has only one option and that is to turn a lot. Try and turn in varied directions and angles so as not to be too predictable. Loops, tail slides, high and low Yo's are all good to make your position a little less predictable. Be very vigilant to watch for planes coming in to BnZ or slash attack at you, those are the guys who are dangerous since nobody will be able to stay behind you for long regardless of what aggressive maneuvers they use to turn with you. If they turn with you and stay too long you will be behind them, and quickly. Never accept a Head-On attack, it is suicidal and your maneuvering speed is so low in a A6M2 that you should be able to aggressively avoid a HO situation.
To beat it
The A6M2 should rarely be a real threat and if it is then the situation that lead to your problem is often long in developing. The A6M2 should never catch anything except the slowest of fighters in a drag-race unless you are flying something like a Hurricane which is equally slow (or worse). The weapons on the A6M2 are difficult to use and have very little ammunition so if you can avoid them long enough you can actually run the cannons dry and leave the Zero with only small 7.7mm guns (which have tonnes of ammo) which are barely effective.
Identifying a A6M2 is easy with the white colour (what I always related Zero's to look like). You should know that any zero though is a unbelievable turner and that the rapid turn rate can cause all sorts of problems.
Offensively, don't turn with it, extend, reverse, and then come back. The A6M2 is very vulnerable when slow and turning to brief snapshots. If you can extend even slightly there is little chance a Zero can even get a snapshot at you to do any damage. The key is to time you passes properly so that you get the best angle you can in order to make your attack. Be patient because the A6M2 is unlikely to have anywhere near enough speed potential to escape. Try to time your attacks to present the rear or side when his wings are showing a full plane shot. Be very careful about your lead angle though, the Zero can turn so quickly you can easily over-lead him and end up passing in-front of him. The A6M2 is also likely to be travelling very slowly so watch out for collisions.
Defensively, the key is to try and extend at the first chance you get. If you have altitude to use then try and accelerate in a slight dive to above 300mph, then level and watch the Zero fall behind quickly. Try and complicate his aim with slight wing rolls or climbs. The Zero is a poor climber and acceleration is not great either with a top speed that is so low. Never get into a turning fight with a Zero unless you have a death wish or can keep the fight at high speeds. Even at high speeds though the Zero is still likely to keep you blacked out trying to pull impossible lead for a shot. That often will lead to slow turns where the Zero will eat you alive. You really only need to get the Zero to miss you once where you can put full power into an extension to most likely be able to escape. Never get too greedy though and come back to re-engage too soon, the Zero is not going anywhere and you should have lots of time to build up an altitude and speed advantage before coming back to engage.